This is the cut I've been asked for more than any other in the chair room lately, and it's not a trim you can talk your way through — a proper wolf cut with curtain bangs is built section by section, with the crown, sides and back all working together to earn that shape. I cut this one start to finish and photographed every stage, so you can see exactly where the length actually comes off, not just admire the finished blow-dry. Read it as a briefing document for your own appointment rather than a DIY manual — the cutting itself belongs behind a chair, not in your bathroom mirror.
Section the Hair
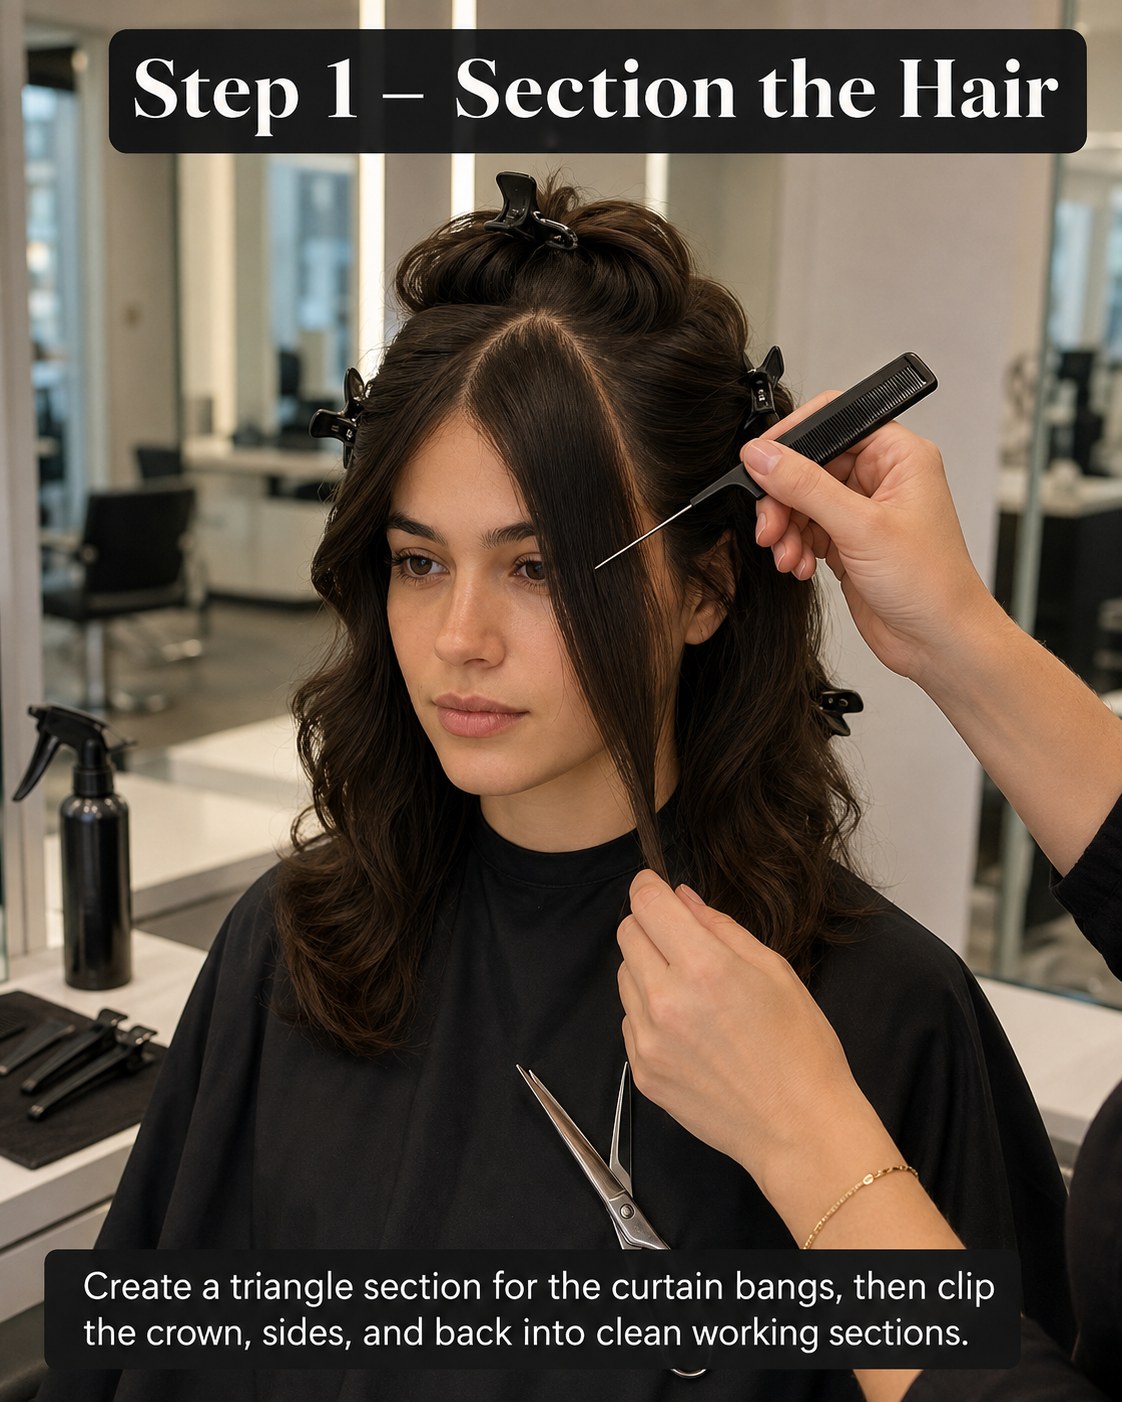
Every wolf cut with curtain bangs starts the same way I've started every fringe I've cut in sixteen years behind the chair: with a proper triangle section, not a guess. I take a fine-tail comb, part down the centre from the crown, and bring two diagonal lines forward to the outer corner of each eyebrow — that width decides whether the finished fringe swoops or just sits there.
- The apex matters: start your triangle too far back and the bangs go flat instead of curtaining round the face.
- Clip everything else away — crown, sides, back — so you're not fighting stray hair while you work on the guide.
- Dry or damp, never soaking: I keep this section just damp with the spray bottle so I can see exactly where it'll fall once dry.
This section decides the whole shape of the cut, so I'd rather spend three extra minutes here than an hour fixing an off-centre fringe later.
Cut the Curtain Bang Guide
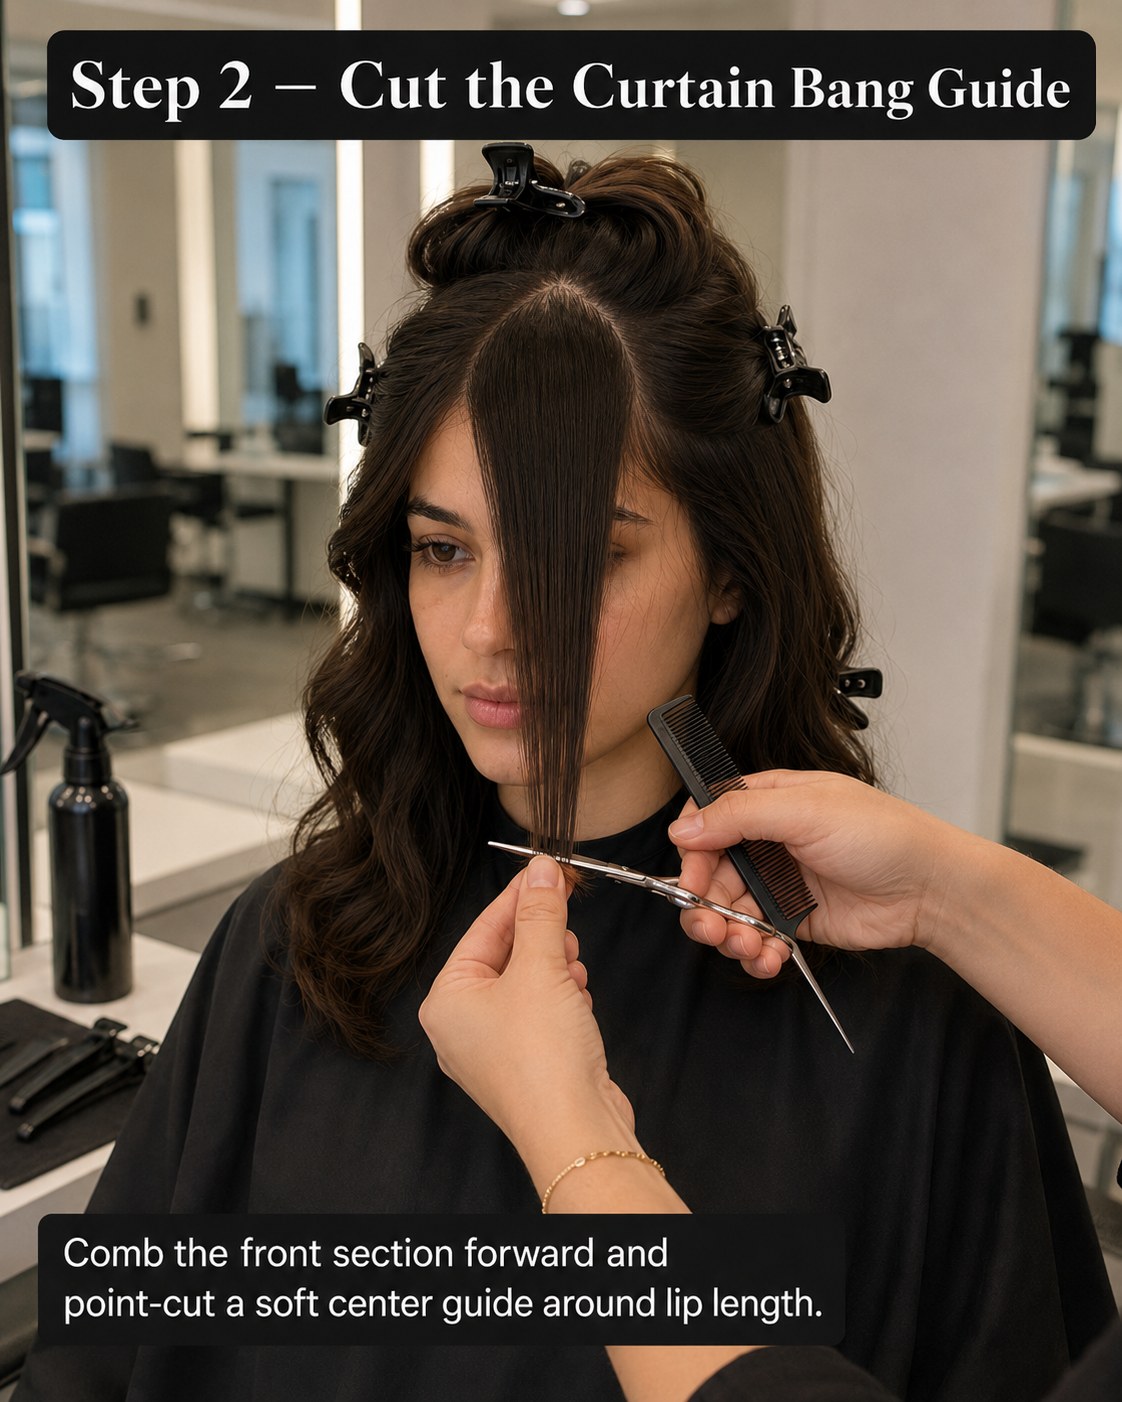
With the front section combed forward flat against the face, I point-cut a soft centre guide roughly to lip length — never a straight line across, always tiny vertical snips into the ends so the fringe has somewhere to move. This guide is what the rest of the fringe grows from, so I check it against the bridge of the nose and the corners of the mouth before committing to a single cut.
A session hairdresser backstage once told me: never cut a fringe with the scissors closed straight across — point into it like you're drawing with the blade, not chopping with it. Years on, I still hear her saying that every time I pick up my shears.
Wet hair sits around a centimetre longer once dry, more on wavy or curly textures thanks to shrinkage, so I always cut this guide slightly longer than the final length I actually want.
Shape the Curtain Bangs
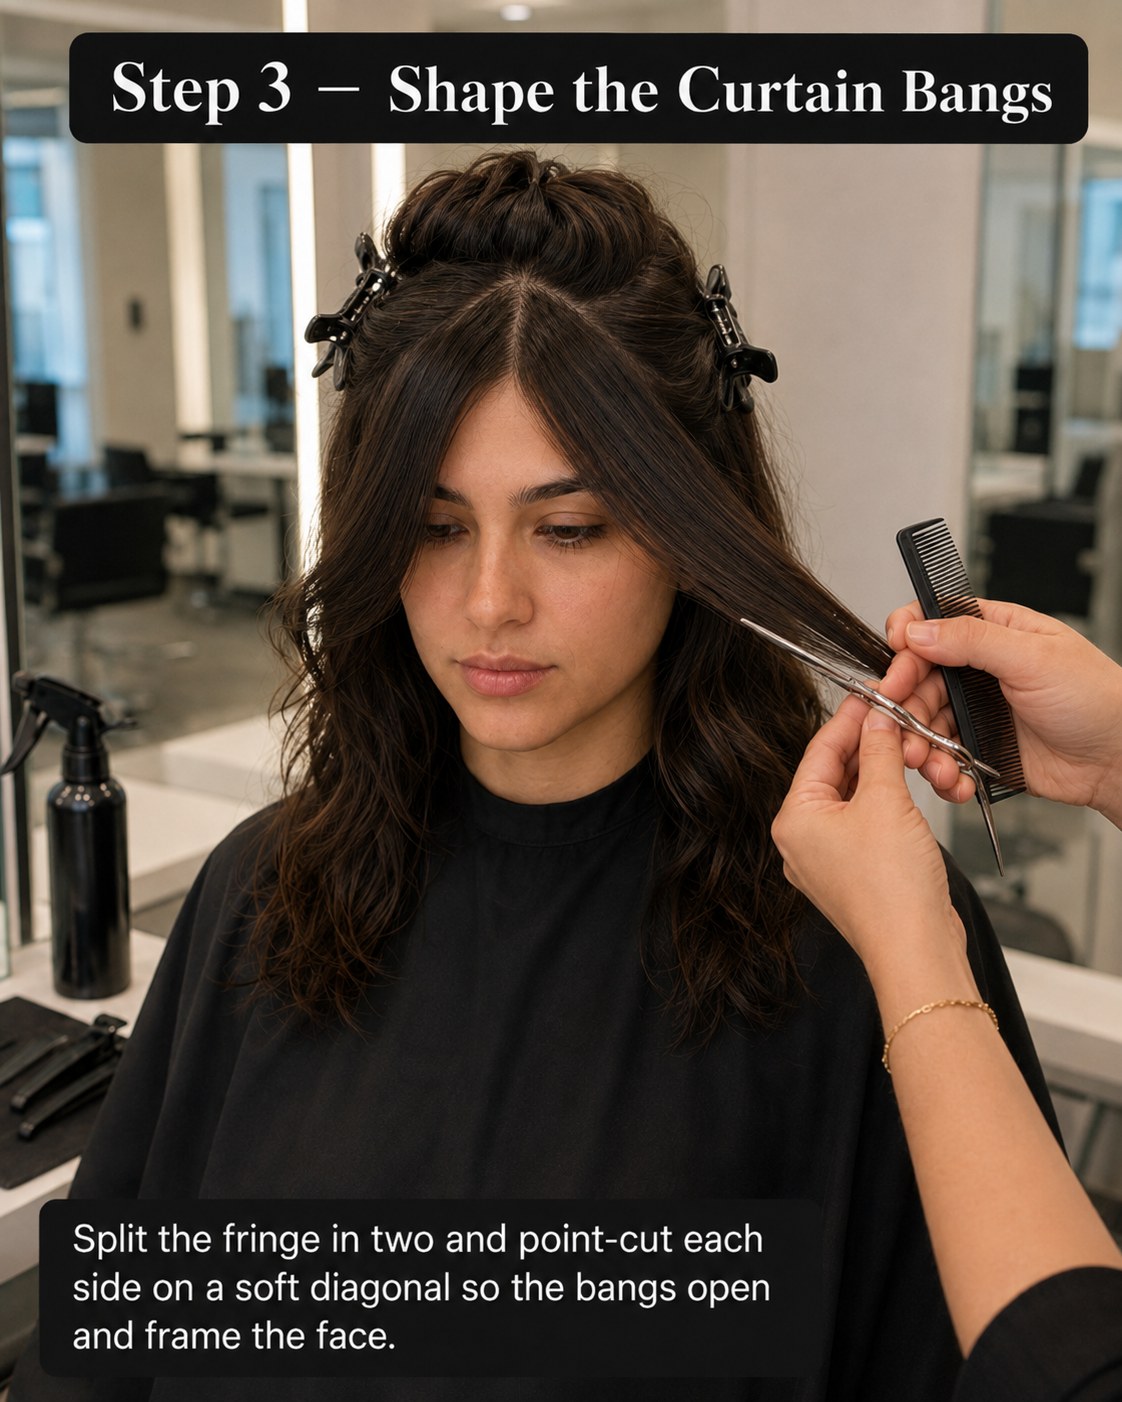
Once the centre guide is set, I split the fringe clean down the middle and work each side separately, point-cutting on a soft diagonal that runs longer at the outer corners and shorter towards the centre part. This is what actually makes curtain bangs curtain — without that diagonal grading, you've simply cut a fringe with a parting in it.
Getting the diagonal right
I hold each section out from the head at a slight angle and cut into the ends with the points of the shears half-open, working upward in small bites rather than one long slice. Too much length removed at the outer edge and the curtain has nothing to sweep back with; too little and it reads as a full fringe that's simply been parted.
This is the step where clients usually gasp a bit at how much hair looks like it's coming away — it isn't as much as it feels, it's just spread across two sides instead of one straight snip.
Blend the Front Layers
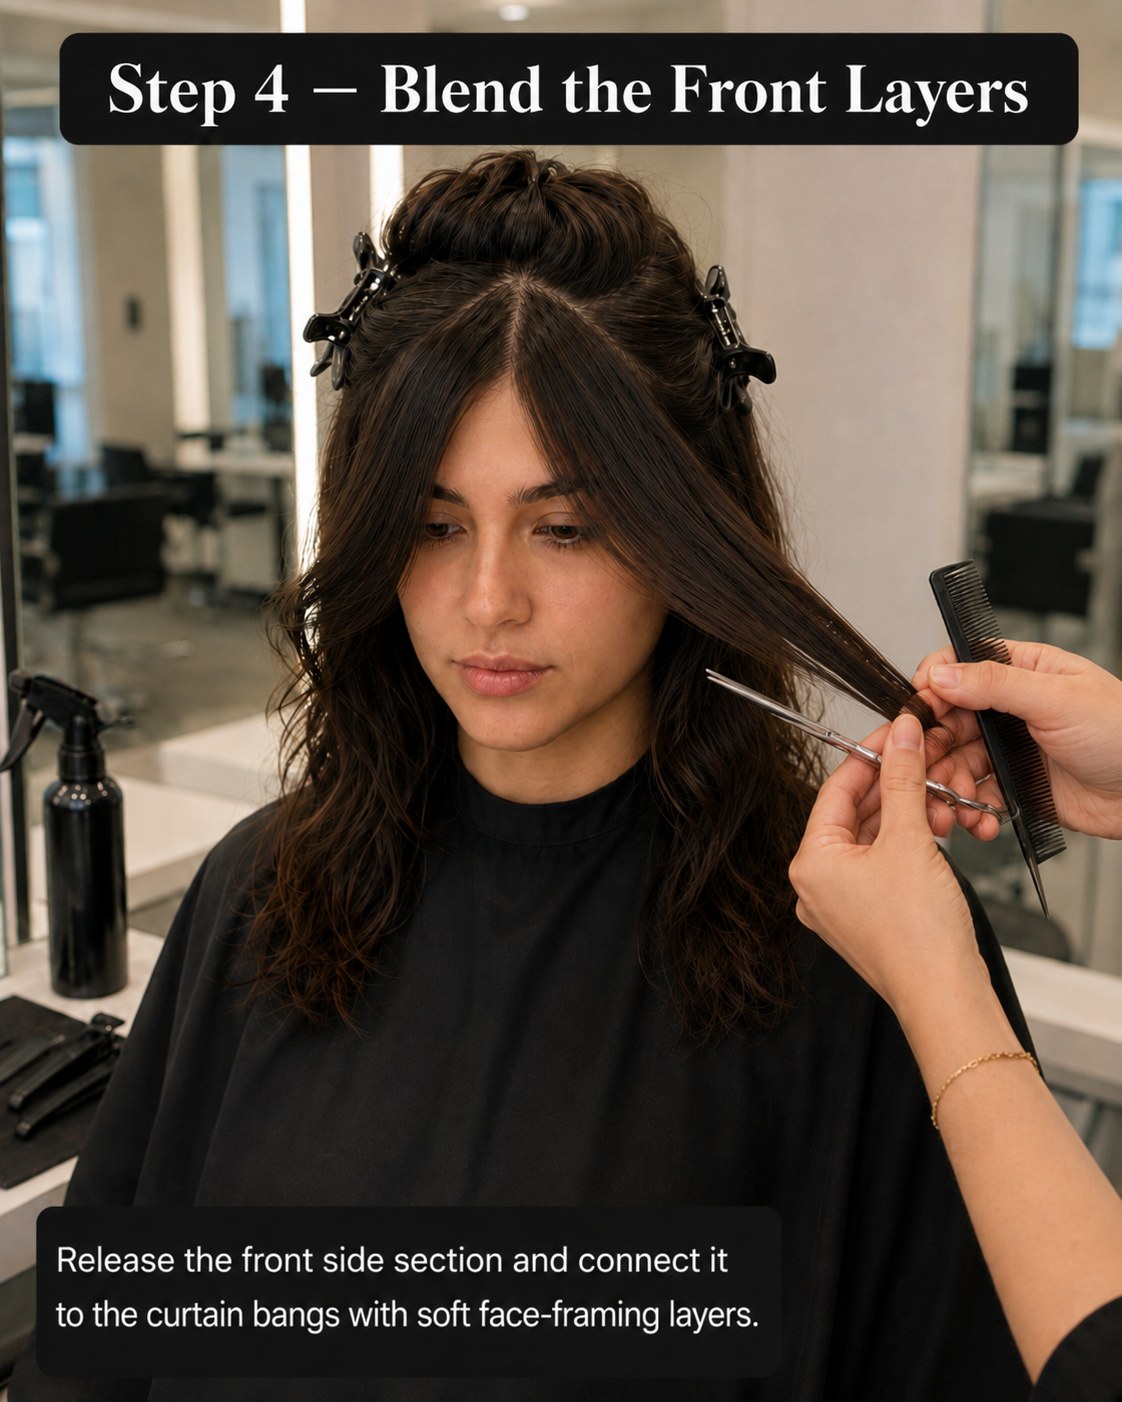
Now I release the front side section next to the fringe and connect it in, using the same point-cutting motion so there's no visible join between where the curtain bangs end and the face-framing layers begin. The comb stays busy here — comb up, check the line, comb down, check it again in the mirror.
- Blend, don't blunt: soft face-framing layers should feel like an extension of the fringe, not a second haircut bolted on.
- Check both sides together before moving on — asymmetry creeps in fast when you're working one side at a time.
- Point-cut, always: a straight edge here reads heavy and dates the whole style within a few washes.
This step decides whether the fringe looks grown-in and effortless or cut in isolation from the rest of the hair — worth doing slowly.
Cut the Crown Layers
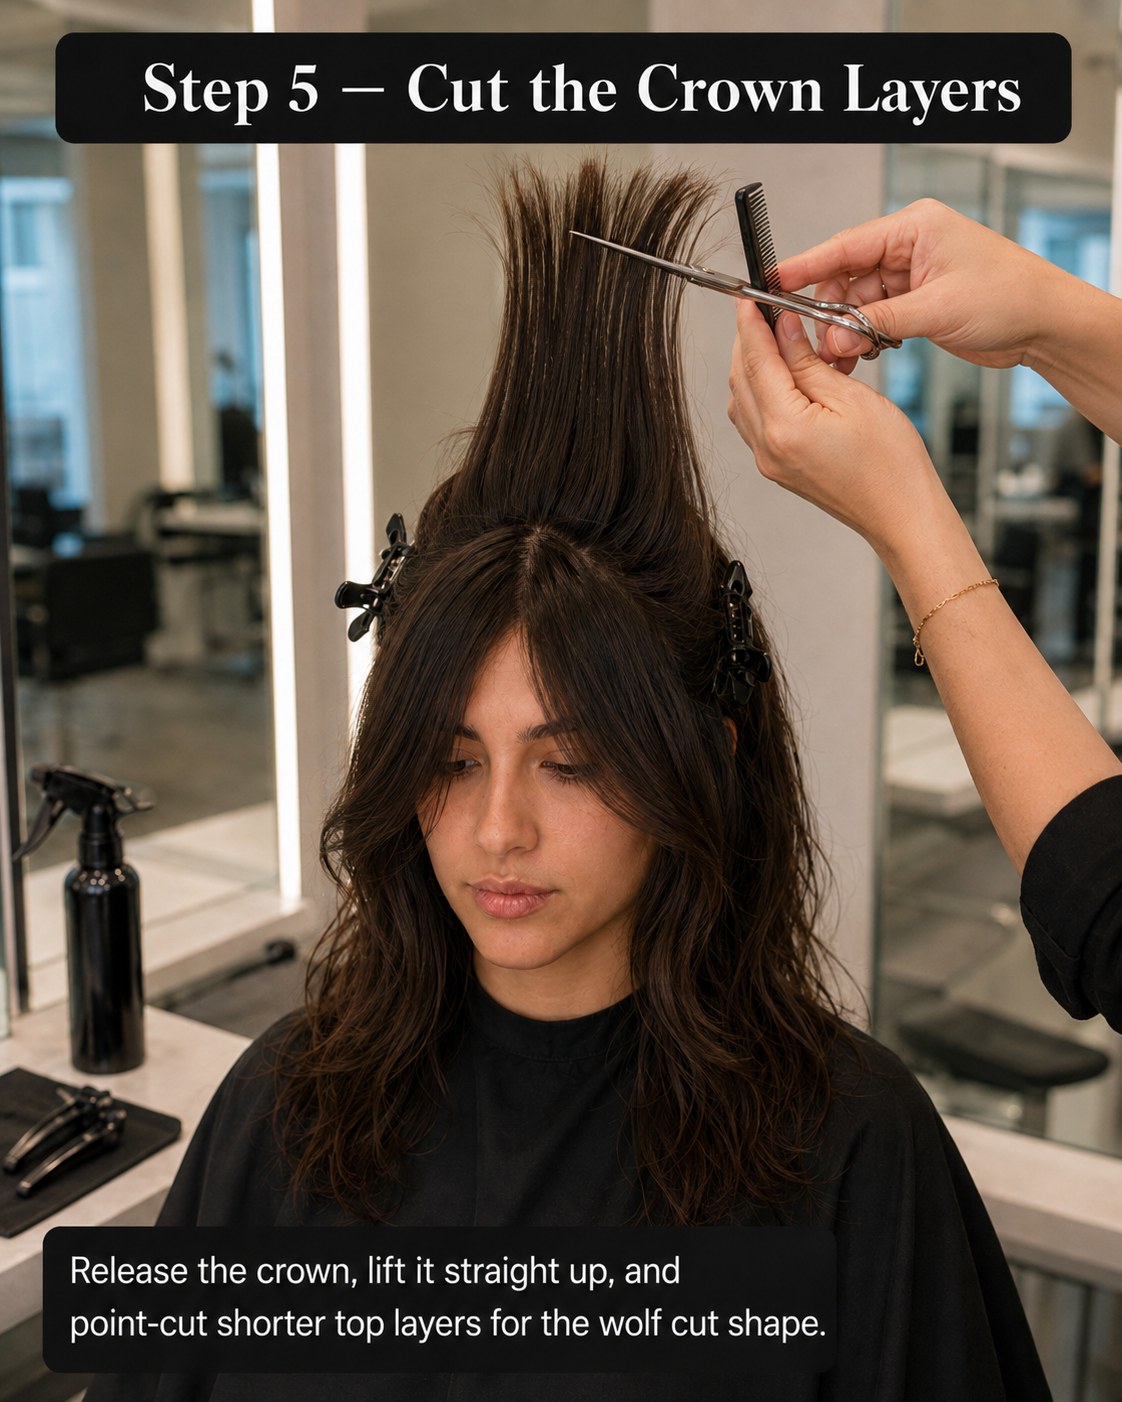
This is the step that actually earns the name wolf cut. I release the crown, comb it straight up away from the scalp, and point-cut the top layers noticeably shorter than everything underneath. Lifted like that, almost vertical, you can see exactly how much shorter it needs to be to create real lift once it's dry.
Why the crown makes the wolf
A shag gives you movement through the mid-lengths; a wolf cut adds proper short layers at the crown on top of that, so the silhouette gets that slightly dishevelled texture instead of falling flat under its own weight. Cut this too conservatively and you'll end up with a shag that photographs fine but never does anything on a Tuesday morning.
I always warn clients this step looks alarming mid-cut, hair standing up everywhere — it settles the second the layers drop back down.
Connect the Side Layers
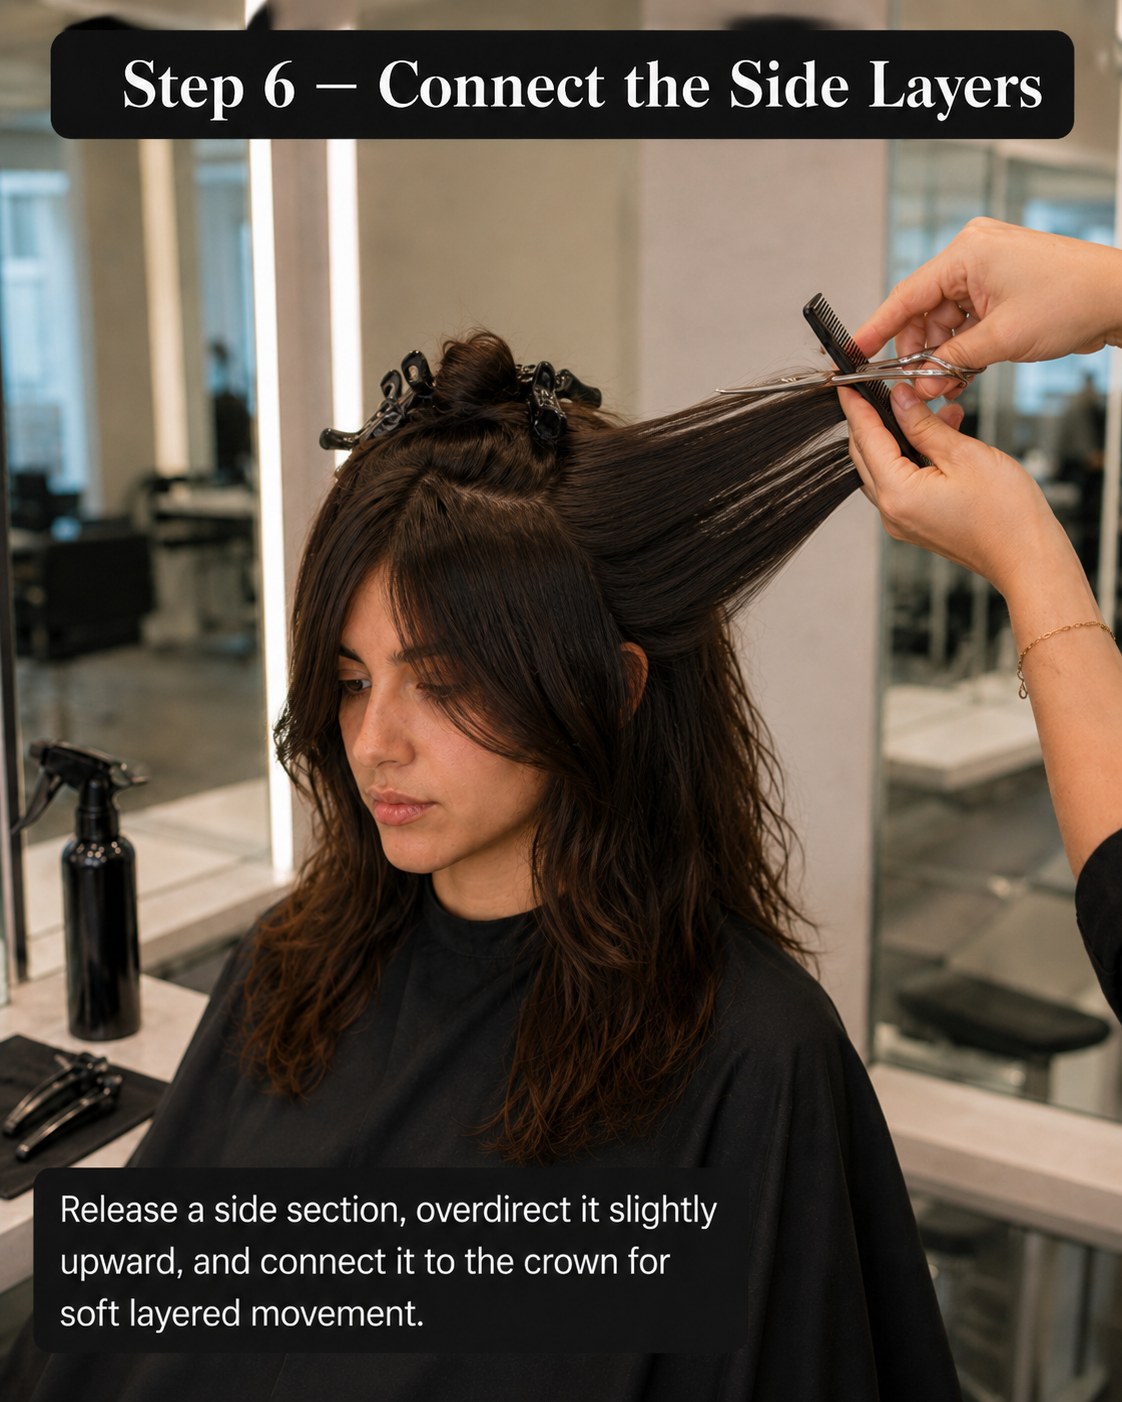
Working out from the crown, I release one side section at a time and overdirect it slightly upward and back towards the crown point before cutting, connecting the new layer straight into the shorter ones just finished. Overdirecting like this — pulling hair to an angle it doesn't naturally sit at before you cut — is how layers blend into each other rather than stepping down in visible shelves.
The classic mistake happens right here: cutting side sections at the angle they fall naturally, rather than lifted and overdirected. Do that and you get a flat top with sudden longer layers underneath — no gradual movement, no wolf shape, just a haircut with an ambitious name.
Layer the Back
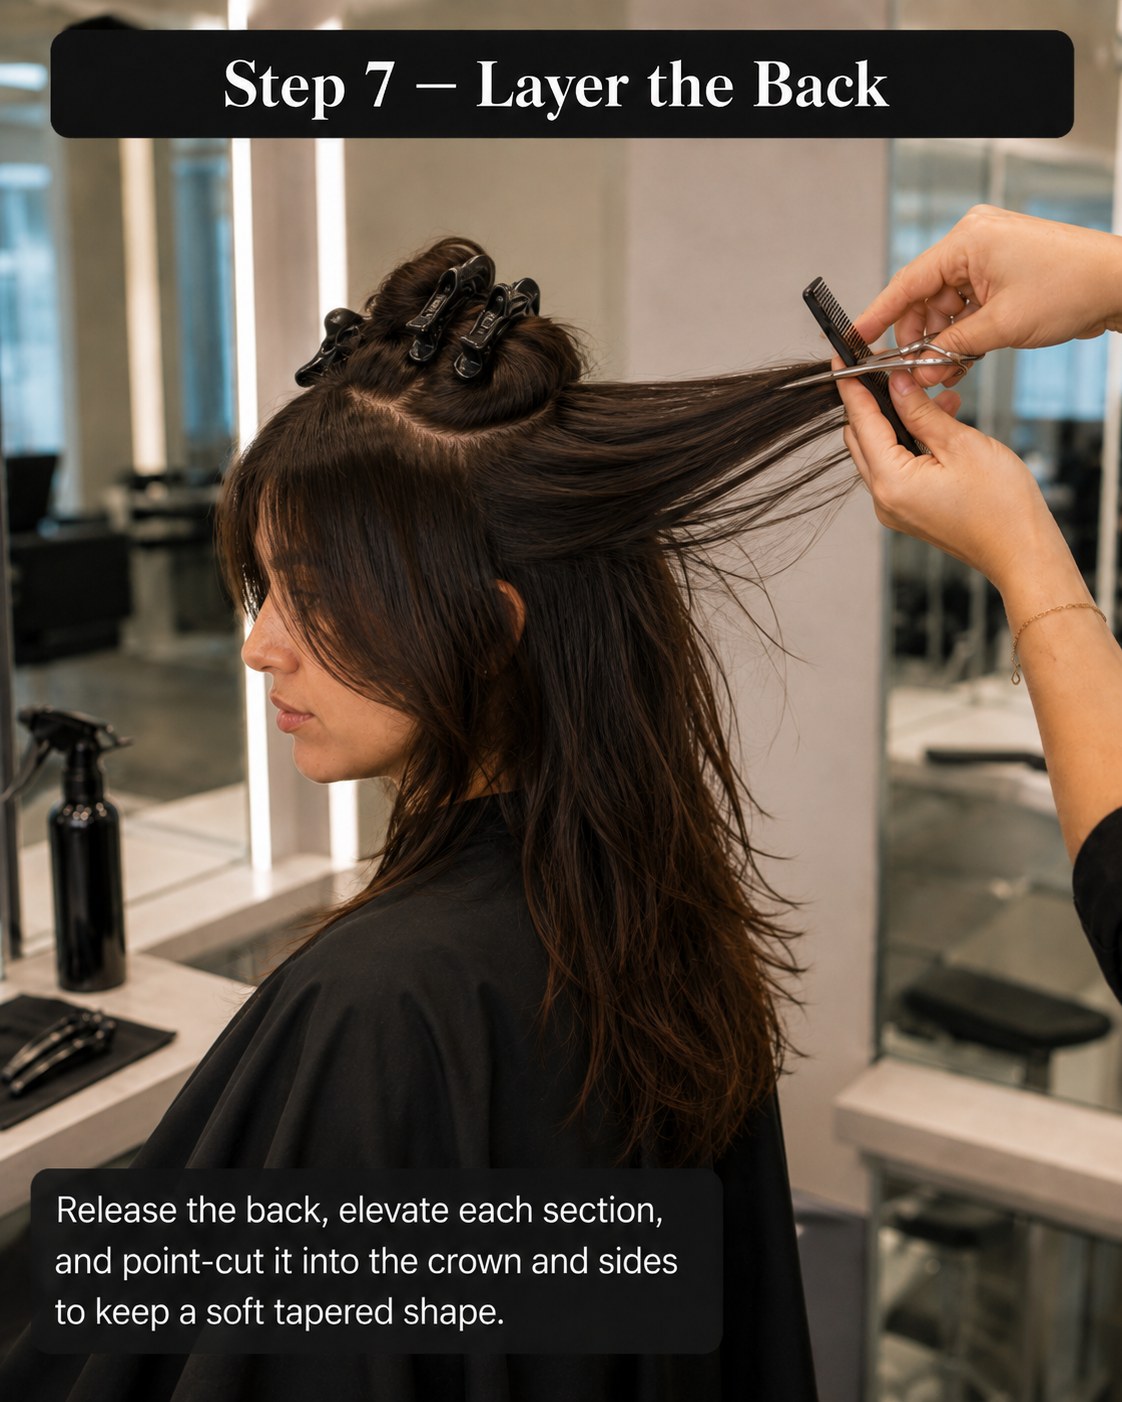
The back gets the same treatment, section by section, elevated up and out from the head before I point-cut it into the crown and sides already shaped. Elevation angle does all the work here: the higher I lift each section before cutting, the shorter and more graduated that layer sits once it falls back down.
- Keep the elevation consistent section to section, or you'll get patches of hair behaving completely differently once dry.
- Point-cut, don't blunt-cut, even at the back — this is where home fixes usually go wrong, because nobody checks it in the mirror.
- Comb through after every section to catch stray hair that's escaped the elevation and would sit heavier than the rest.
By the time the back is done, the hair should move as one connected shape from crown to ends, not three separate haircuts stitched together.
Refine the Ends
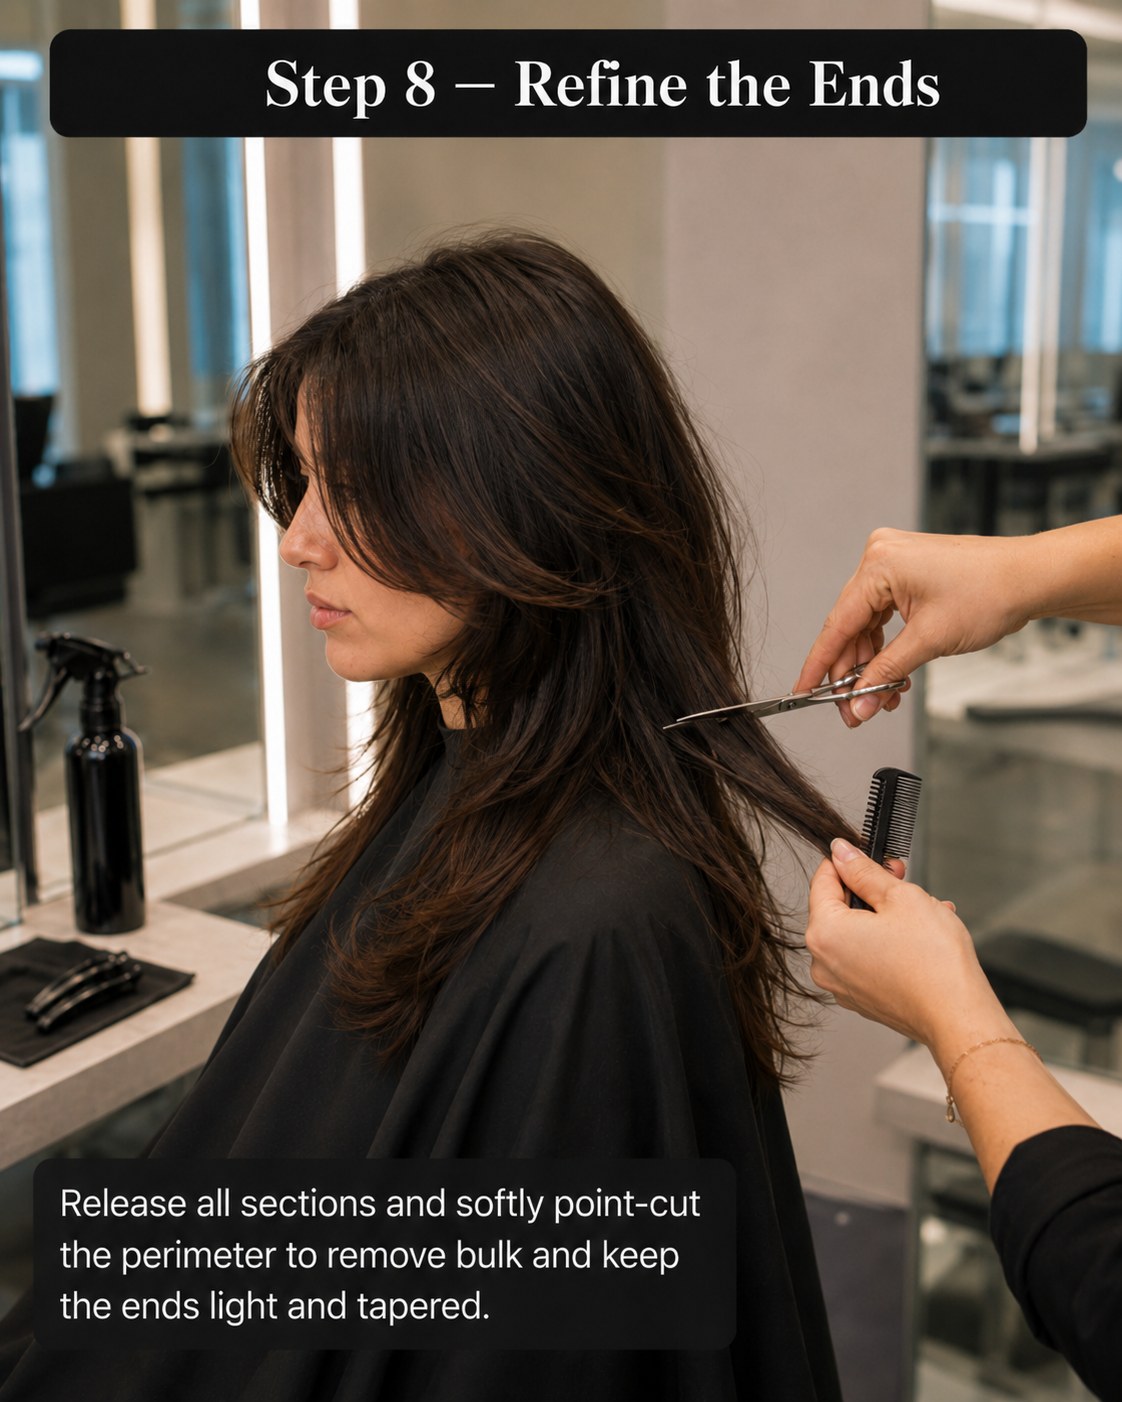
Every clip comes out for this last cutting step, and I go over the entire perimeter with soft point-cuts to remove any remaining bulk and keep the ends genuinely light rather than just short. This is the difference between a wolf cut that moves in the wind and one that sits like a solid curtain — weight removed from the very ends, not the lengths.
I check this with the hair combed down flat in sections, looking for any line that reads as straight or heavy against the light. If I find one, it's a few more point-cuts, never a fresh blunt trim — you can always take more off, you can't put it back on.
This is also the moment I check the fringe one final time against the finished layers, because curtain bangs that looked perfect on their own can suddenly look too heavy once the rest of the shape is done around them.
Blow-Dry for Volume
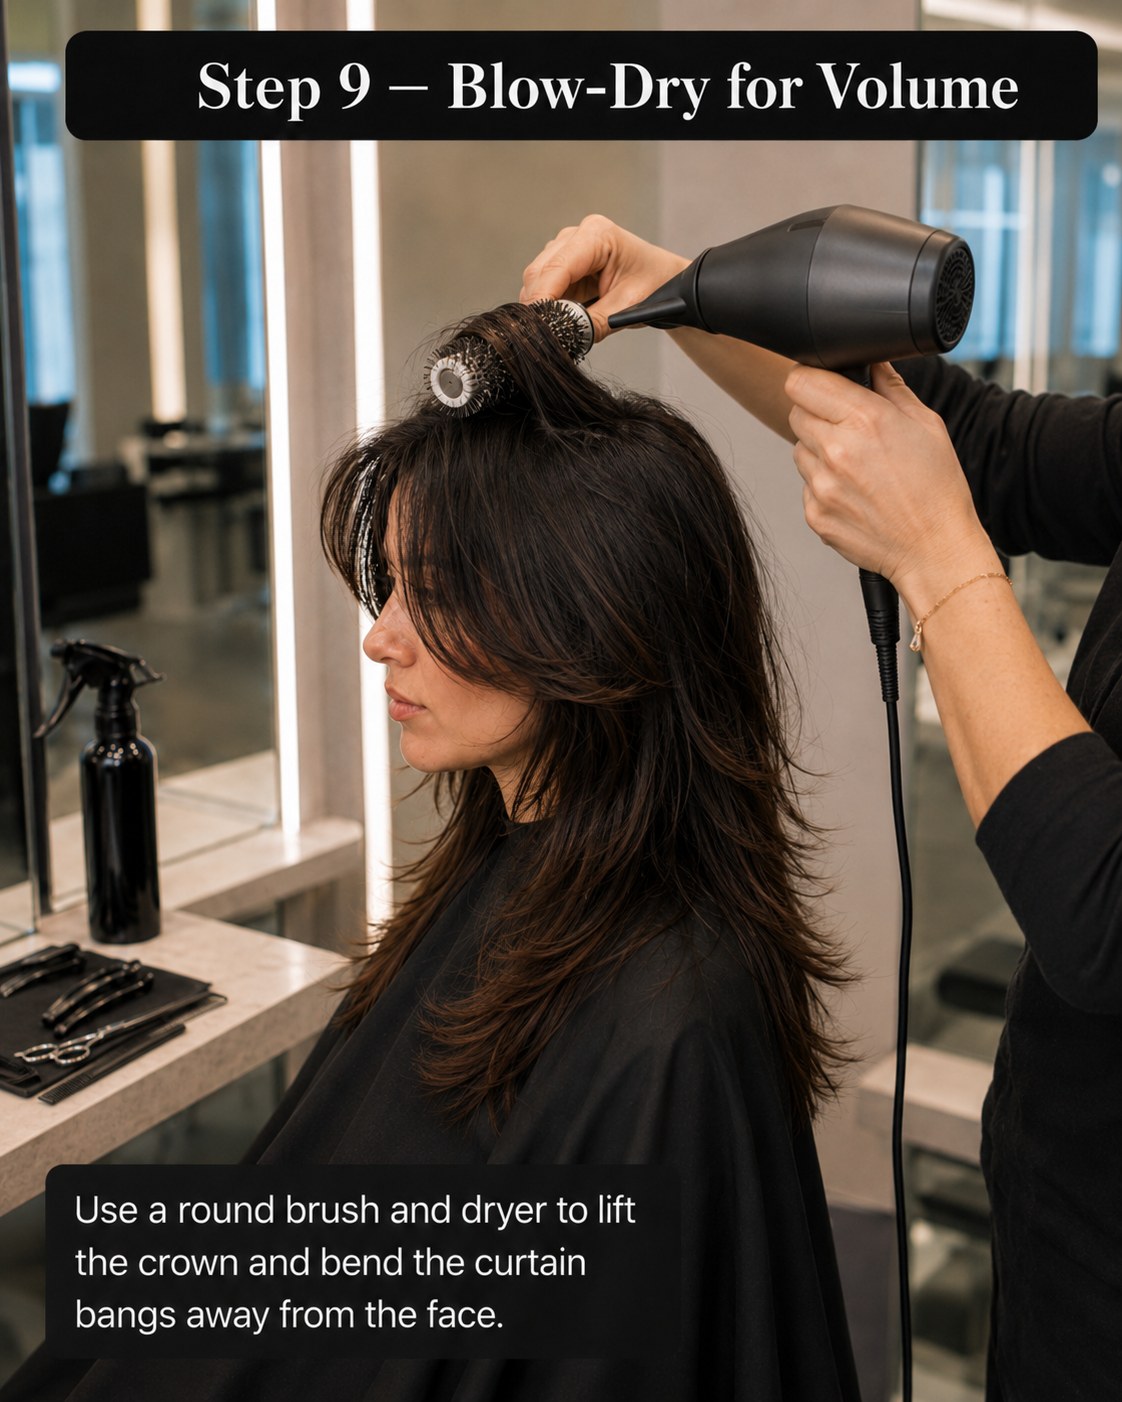
Cut hair only tells half the story — the blow-dry is where a wolf cut with curtain bangs either comes alive or falls flat, literally. I work a medium round brush, roughly 33mm barrel, through the crown first, lifting the roots as I dry to build the volume the short top layers were cut for, then move to the fringe, rolling it under and away from the face rather than straight down.
Heat protectant goes on before any of this, always — I dry at a moderate heat with the dryer's concentrator nozzle, never blasting straight onto the scalp, and finish each section on a cool shot to set the shape before moving to the next.
First-attempt timing: professionally this blow-dry takes me about ten minutes once the cut's done; give yourself nearer twenty the first few times you're doing it on your own hair with one hand doing most of the work.
The Finished Wolf Cut with Curtain Bangs
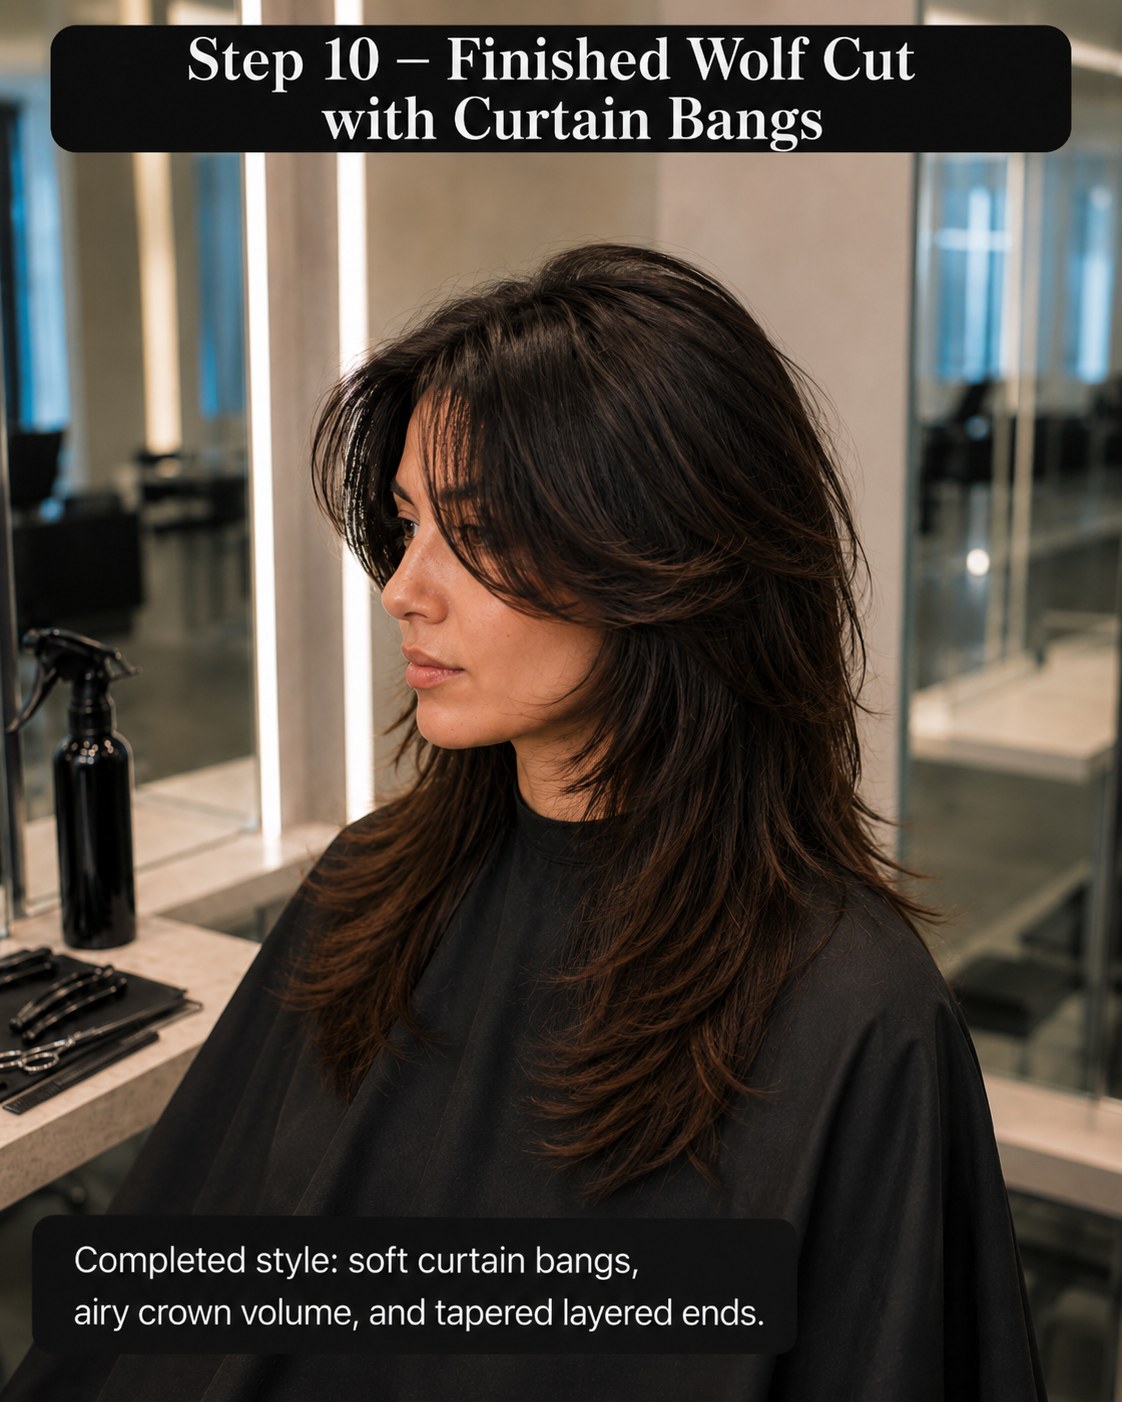
What you end up with is exactly what this last photograph shows — soft, sweeping curtain bangs, real airy volume through the crown, and tapered layered ends that don't sit heavy on the shoulders. It's a proper wolf cut with curtain bangs, not a shag wearing a fringe for the photos.
Weather rating: this one copes well with a light Manchester drizzle since the layers already have movement built in, but heavy rain will flatten the crown volume fast — pack a small round brush and a travel dryer if you know you're heading out in it.
Book in every six to eight weeks to keep the shorter crown layers doing their job; leave it much longer and the wolf cut slowly grows back into a plain shag, which isn't a disaster, just a different haircut than the one you asked for.
The real proof is always how a cut behaves on a normal Wednesday, not just fresh out of the chair — and this one, cut section by section the way it's shown here, still had movement three washes later when I checked back with the model. That's the whole point of doing the layers properly in the first place.

- Tools & Products


Frequently Asked Questions
Can I get a wolf cut with curtain bangs if I have fine hair?
Yes, honestly it can be one of the better cuts for fine hair since the shorter crown layers create the illusion of density, but ask your stylist to keep the layers a touch longer and less aggressive than they would for thick hair, or you'll lose too much overall weight.
Will curtain bangs suit my face shape?
Curtain bangs are one of the most forgiving fringes going, graded to fall away from the face rather than sit across it. Bring a reference photo to your consultation so your stylist can adjust the centre point and length to your own features.
Can I cut this myself at home?
This one's for the salon, honestly. The elevation, overdirection and point-cutting through so many connected sections is technical work, and a slip at the crown layers is a six-month grow-out. Use this to brief your hairdresser properly rather than picking up the shears yourself.
How long does a wolf cut with curtain bangs take at the salon?
At my speed it's around an hour including the blow-dry; book closer to ninety minutes for your first appointment with this cut, since your stylist will likely double-check the fringe length against your face a few extra times.